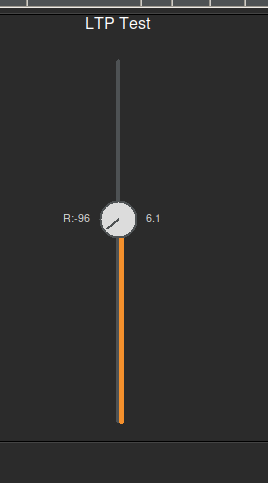
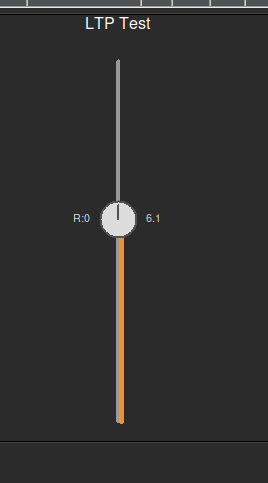
February is Toronto AES Audio Engineering Society Member showcase….
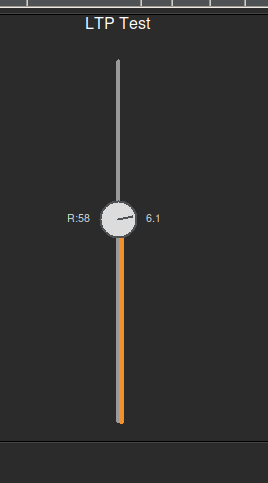
The **Linear Travelling Potentiometer (LTP)** is a hybrid user interface widget designed to save screen real estate while maximizing control density. It integrates a rotary knob directly onto the cap of a linear fader, allowing simultaneous control of two related parameters (e.g., Level and Pan, or Send Level and Send Pan) in a single compact footprint.
Back in 2013, I presented a concept at the AES Toronto meeting called the “Linear Traveling Potentiometer” (LTP).
The idea was simple but mechanically complex: Combine a linear fader and a rotary potentiometer into a single, fluid control. Two motions, one component.
I even had a prototype in a “black bag” that I let people feel without seeing. The goal was to control intensity (volume) and position (pan) simultaneously—a single-point coordinate system for surround sound and spatial audio.
For years, this existed mostly as hardware prototypes and sketches. But the vision never went away.
Now, nearly 15 years later, I have finally recreated my vision purely in software. Click, grab it like a fader… Move up for volume and sideways to pan…
I’ve brought the “Two in One” concept to life digitally. No moving parts, just the physics of the original idea translated into code.
It’s been a long road from that first presentation to this software build. Sometimes the technology just needs to catch up to the idea.
# builder_audio/dynamic_gui_create_custom_LTP.py
#
# A Linear Traveling Potentiometer (LTP) widget.
# Acts as a vertical fader, but the cap is a rotatable knob.
# Control + Drag rotates the knob (-100 to 100).
# Standard Drag moves the fader vertically.
# “Freestyle” mode allows adjusting both axes simultaneously (vertical=fader, horizontal=rotation).
#
# Author: Anthony Peter Kuzub
# Blog: www.Like.audio (Contributor to this project)
#
# Professional services for customizing and tailoring this software to your specific
# application can be negotiated. There is no charge to use, modify, or fork this software.
#
# Build Log: https://like.audio/category/software/spectrum-scanner/
# Source Code: https://github.com/APKaudio/
# Feature Requests can be emailed to i @ like . audio
#
# Version 20250821.200641.1
import tkinter as tk
from tkinter import ttk
import math
from managers.configini.config_reader import Config
app_constants = Config.get_instance()
# — Default Configuration Constants —
DEFAULT_LTP_WIDTH = 100
DEFAULT_MIN_VAL = 0.0
DEFAULT_MAX_VAL = 100.0
DEFAULT_LOG_EXPONENT = 1.0
DEFAULT_BORDER_WIDTH = 0
DEFAULT_BORDER_COLOR = “black”
DEFAULT_TICK_SIZE_RATIO = 0.2
DEFAULT_TICK_FONT_FAMILY = “Helvetica”
DEFAULT_TICK_FONT_SIZE = 10
DEFAULT_TICK_COLOR = “light grey”
DEFAULT_VALUE_FOLLOW = True
DEFAULT_VALUE_HIGHLIGHT_COLOR = “#f4902c”
DEFAULT_CAP_RADIUS = 18 # Radius of the knob cap (Increased by 20% from 15)
ROTATION_MIN = –100.0
ROTATION_MAX = 100.0
# ———————————————
from workers.logger.logger import debug_logger
from workers.logger.log_utils import _get_log_args
from workers.styling.style import THEMES, DEFAULT_THEME
from workers.handlers.widget_event_binder import bind_variable_trace
class CustomLTPFrame(tk.Frame):
def __init__(
self,
master,
config,
path,
state_mirror_engine,
base_mqtt_topic,
subscriber_router,
):
colors = THEMES.get(DEFAULT_THEME, THEMES[“dark”])
fader_style = colors.get(“fader_style”, {})
self.bg_color = colors.get(“bg”, “#2b2b2b”)
self.accent_color = colors.get(“accent”, “#33A1FD”)
self.neutral_color = colors.get(“neutral”, “#dcdcdc”)
self.track_col = colors.get(“secondary”, “#444444”)
self.handle_col = colors.get(“fg”, “#dcdcdc”)
self.text_col = colors.get(“fg”, “#dcdcdc”)
self.min_val = float(config.get(“value_min”, DEFAULT_MIN_VAL))
self.max_val = float(config.get(“value_max”, DEFAULT_MAX_VAL))
self.log_exponent = float(config.get(“log_exponent”, DEFAULT_LOG_EXPONENT))
self.reff_point = float(
config.get(“reff_point”, (self.min_val + self.max_val) / 2.0)
)
self.border_width = int(config.get(“border_width”, DEFAULT_BORDER_WIDTH))
self.border_color = config.get(“border_color”, DEFAULT_BORDER_COLOR)
# Cap Styling
self.cap_radius = int(config.get(“cap_radius”, DEFAULT_CAP_RADIUS))
self.cap_color = config.get(“cap_color”, self.handle_col)
self.cap_outline_color = config.get(“cap_outline_color”, self.track_col)
# Custom styling
self.tick_size = config.get(“tick_size”, fader_style.get(“tick_size”, DEFAULT_TICK_SIZE_RATIO))
tick_font_family = config.get(“tick_font_family”, fader_style.get(“tick_font_family”, DEFAULT_TICK_FONT_FAMILY))
tick_font_size = config.get(“tick_font_size”, fader_style.get(“tick_font_size”, DEFAULT_TICK_FONT_SIZE))
self.tick_font = (tick_font_family, tick_font_size)
self.tick_color = config.get(“tick_color”, fader_style.get(“tick_color”, DEFAULT_TICK_COLOR))
self.value_follow = config.get(“value_follow”, fader_style.get(“value_follow”, DEFAULT_VALUE_FOLLOW))
self.value_highlight_color = config.get(“value_highlight_color”, fader_style.get(“value_highlight_color”, DEFAULT_VALUE_HIGHLIGHT_COLOR))
self.value_color = config.get(“value_color”, self.text_col)
super().__init__(
master,
bg=self.bg_color,
bd=self.border_width,
relief=“solid”,
highlightbackground=self.border_color,
highlightthickness=self.border_width,
)
self.path = path
self.state_mirror_engine = state_mirror_engine
self.base_mqtt_topic = base_mqtt_topic
self.subscriber_router = subscriber_router
self.config = config
self.freestyle = config.get(“freestyle”, False)
# Initialize Variables
# Linear Value (Standard Fader)
self.linear_var = tk.DoubleVar(value=float(config.get(“value_default”, (self.min_val + self.max_val)/2)))
# Rotation Value (Knob)
self.rotation_var = tk.DoubleVar(value=float(config.get(“rotation_default”, 0.0)))
self.temp_entry = None
# Register Widgets with State Mirror Engine
if self.state_mirror_engine and self.path:
# Register main linear variable
self._register_sub_widget(“linear”, self.linear_var)
# Register rotation variable
self._register_sub_widget(“rotation”, self.rotation_var)
# Bind traces for Redraw
self.linear_var.trace_add(“write”, self._request_redraw)
self.rotation_var.trace_add(“write”, self._request_redraw)
def _register_sub_widget(self, suffix, variable):
if suffix == “linear”:
target_path = self.path
else:
target_path = f“{self.path}/{suffix}“
sub_config = self.config.copy()
sub_config[“path”] = target_path
if suffix == “rotation”:
sub_config[“value_min”] = ROTATION_MIN
sub_config[“value_max”] = ROTATION_MAX
self.state_mirror_engine.register_widget(target_path, variable, self.base_mqtt_topic, sub_config)
callback = lambda: self.state_mirror_engine.broadcast_gui_change_to_mqtt(target_path)
bind_variable_trace(variable, callback)
topic = self.state_mirror_engine.get_widget_topic(target_path)
if topic:
self.subscriber_router.subscribe_to_topic(topic, self.state_mirror_engine.sync_incoming_mqtt_to_gui)
self.state_mirror_engine.initialize_widget_state(target_path)
def _request_redraw(self, *args):
self.event_generate(“<<RedrawLTP>>”)
def _open_manual_entry(self, event, target_var, min_v, max_v):
if self.temp_entry and self.temp_entry.winfo_exists():
return
self.temp_entry = tk.Entry(self, width=8, justify=“center”)
self.temp_entry.place(x=event.x – 20, y=event.y – 10)
current_val = target_var.get()
self.temp_entry.insert(0, str(current_val))
self.temp_entry.select_range(0, tk.END)
self.temp_entry.focus_set()
submit_cmd = lambda e: self._submit_manual_entry(e, target_var, min_v, max_v)
self.temp_entry.bind(“<Return>”, submit_cmd)
self.temp_entry.bind(“<FocusOut>”, submit_cmd)
self.temp_entry.bind(“<Escape>”, self._destroy_manual_entry)
def _submit_manual_entry(self, event, target_var, min_v, max_v):
raw_value = self.temp_entry.get()
try:
new_value = float(raw_value)
if min_v <= new_value <= max_v:
target_var.set(new_value)
else:
if app_constants.global_settings[“debug_enabled”]:
debug_logger(
message=f“⚠️ Value {new_value} out of bounds! Ignoring.”,
**_get_log_args(),
)
except ValueError:
pass
self._destroy_manual_entry(event)
def _destroy_manual_entry(self, event):
if self.temp_entry and self.temp_entry.winfo_exists():
self.temp_entry.destroy()
self.temp_entry = None
class CustomLTPCreatorMixin:
def _create_custom_ltp(self, parent_widget, config_data, **kwargs):
label = config_data.get(“label_active”)
config = config_data
path = config_data.get(“path”)
layout_config = config.get(“layout”, {})
font_size = layout_config.get(“font”, 10)
custom_font = (“Helvetica”, font_size)
custom_colour = layout_config.get(“colour”, None)
state_mirror_engine = self.state_mirror_engine
subscriber_router = self.subscriber_router
base_mqtt_topic_from_path = kwargs.get(“base_mqtt_topic_from_path”)
colors = THEMES.get(DEFAULT_THEME, THEMES[“dark”])
bg_color = colors.get(“bg”, “#2b2b2b”)
secondary_color = colors.get(“secondary”, “#444444”)
frame = CustomLTPFrame(
parent_widget,
config=config,
path=path,
state_mirror_engine=state_mirror_engine,
base_mqtt_topic=base_mqtt_topic_from_path,
subscriber_router=subscriber_router,
)
if label:
lbl = tk.Label(frame, text=label, font=custom_font, background=bg_color, foreground=colors.get(“fg”, “#dcdcdc”))
if custom_colour:
lbl.configure(foreground=custom_colour)
lbl.pack(side=tk.TOP, pady=(0, 5))
width = layout_config.get(“width”, DEFAULT_LTP_WIDTH)
height = layout_config.get(“height”, 300)
canvas = tk.Canvas(
frame, width=width, height=height, bg=bg_color, highlightthickness=0
)
canvas.pack(fill=tk.BOTH, expand=True)
canvas.update_idletasks()
# Visual State
visual_props = {“secondary”: secondary_color}
hover_color = “#999999”
# Interaction State
drag_state = {“start_x”: 0, “start_y”: 0, “start_val_lin”: 0, “start_val_rot”: 0, “active”: False}
def on_press(event):
drag_state[“active”] = True
drag_state[“start_x”] = event.x
drag_state[“start_y”] = event.y
drag_state[“start_val_lin”] = frame.linear_var.get()
drag_state[“start_val_rot”] = frame.rotation_var.get()
if not (event.state & 0x0004): # No Ctrl
update_linear_from_y(event.y)
def on_drag(event):
if not drag_state[“active”]:
return
is_ctrl = event.state & 0x0004
if frame.freestyle:
# Vertical adjusts fader, Horizontal adjusts rotation
update_linear_from_y(event.y)
update_rotation_from_x(event.x)
elif is_ctrl:
# Rotation Mode (Vertical drag for rotation)
dy = drag_state[“start_y”] – event.y
sensitivity = 2.0
new_rot = drag_state[“start_val_rot”] + (dy * sensitivity)
new_rot = max(ROTATION_MIN, min(ROTATION_MAX, new_rot))
frame.rotation_var.set(new_rot)
else:
# Linear Mode
update_linear_from_y(event.y)
def on_release(event):
drag_state[“active”] = False
def update_linear_from_y(y):
h = canvas.winfo_height()
norm_y = (y – 20) / (h – 40)
norm_y = 1.0 – max(0.0, min(1.0, norm_y))
log_norm_pos = norm_y**frame.log_exponent
current_value = frame.min_val + log_norm_pos * (
frame.max_val – frame.min_val
)
frame.linear_var.set(current_value)
def update_rotation_from_x(x):
w = canvas.winfo_width()
# Rotation area same length as fader height (h-40)
# Center it at the current rail? Or just relative to the whole canvas width.
# User said “area to move it left or right should be about the same length as the fader”
h = canvas.winfo_height()
fader_len = h – 40
# Start rotation from center of canvas
cx = w / 2
# Offset from center
dx = x – cx
# Map dx to rotation value. fader_len total width for full rotation range?
# So range is [-fader_len/2, fader_len/2]
norm_x = dx / (fader_len / 2.0)
norm_x = max(–1.0, min(1.0, norm_x))
new_rot = norm_x * 100.0 # ROTATION_MAX
frame.rotation_var.set(new_rot)
def on_alt_click(event):
frame._open_manual_entry(event, frame.linear_var, frame.min_val, frame.max_val)
def redraw(*args):
current_w = canvas.winfo_width()
current_h = canvas.winfo_height()
if current_w <= 1: current_w = width
if current_h <= 1: current_h = height
_draw_ltp_vertical(
frame,
canvas,
current_w,
current_h,
visual_props[“secondary”]
)
frame.bind(“<<RedrawLTP>>”, redraw)
# Initial Draw
redraw()
# Bindings
canvas.bind(“<Button-1>”, on_press)
canvas.bind(“<B1-Motion>”, on_drag)
canvas.bind(“<ButtonRelease-1>”, on_release)
canvas.bind(“<Alt-Button-1>”, on_alt_click)
canvas.bind(“<Configure>”, lambda e: redraw())
def on_enter(event):
visual_props[“secondary”] = hover_color
redraw()
def on_leave(event):
visual_props[“secondary”] = secondary_color
redraw()
canvas.bind(“<Enter>”, on_enter)
canvas.bind(“<Leave>”, on_leave)
return frame
def _draw_ltp_vertical(frame, canvas, width, height, current_secondary):
canvas.delete(“all”)
cx = width / 2
# 1. Track Line
canvas.create_line(
cx, 20, cx, height – 20,
fill=current_secondary, width=4, capstyle=tk.ROUND
)
# 2. Calculate Handle Position (Linear)
value_lin = frame.linear_var.get()
norm_value = (
(value_lin – frame.min_val)
/ (frame.max_val – frame.min_val)
if (frame.max_val – frame.min_val) != 0
else 0
)
norm_value = max(0.0, min(1.0, norm_value))
display_norm_pos = norm_value ** (1.0 / frame.log_exponent)
handle_y = (height – 40) * (1.0 – display_norm_pos) + 20
# 3. Fill Line (from bottom to handle)
canvas.create_line(
cx + 2.5, height – 20, cx + 2.5, handle_y,
fill=frame.value_highlight_color, width=5, capstyle=tk.ROUND
)
# 4. Draw Rotatable Cap (Knob)
rot_val = frame.rotation_var.get()
# 0 val = -90 degrees (Up)
angle_deg = –90 + (rot_val / 100.0) * 135.0
angle_rad = math.radians(angle_deg)
radius = frame.cap_radius
# Cap Circle
canvas.create_oval(
cx – radius, handle_y – radius,
cx + radius, handle_y + radius,
fill=frame.cap_color, outline=frame.cap_outline_color, width=2
)
# Pointer Line
pointer_len = radius * 0.8
px = cx + pointer_len * math.cos(angle_rad)
py = handle_y + pointer_len * math.sin(angle_rad)
canvas.create_line(
cx, handle_y, px, py,
fill=frame.cap_outline_color, width=2, capstyle=tk.ROUND
)
# Values Text
if frame.value_follow:
# Linear Value to the right
canvas.create_text(
cx + radius + 10,
handle_y,
text=f“{value_lin:.1f}“,
fill=frame.value_color,
anchor=“w”,
font=(“Helvetica”, 8)
)
# Rotation Value to the left
canvas.create_text(
cx – radius – 10,
handle_y,
text=f“R:{rot_val:.0f}“,
fill=frame.value_color,
anchor=“e”,
font=(“Helvetica”, 8)
)
### 1. Hybrid Control
* **Linear Fader (Y-Axis):** The vertical position of the cap controls the primary value (typically Volume, Level, or Depth).
* **Rotary Knob (Rotation):** A knob embedded in the fader cap controls a secondary value (typically Pan, Param, or Intensity).
* **Unified Interaction:** Both controls are accessible from the same visual element, reducing mouse travel and UI clutter.
### 2. Interaction Modes
The LTP supports distinct interaction modes to prevent accidental changes:
### 3. Visual Feedback
* **Linear:** Position of the cap along the vertical track.
* **Rotary:** Orientation of the indicator line on the cap.
* **Active State:** The knob glows (default blue/orange) when Rotary control is active (via modifier, latch, or freestyle mode).
* **Pointer:** When adjusting rotation, the indicator line extends (10x length) to provide precise visual feedback, then retracts on release.
* **Channel Strips:** Volume (Linear) + Pan (Rotary).
* **Effect Sends:** Send Level (Linear) + Pre/Post Toggle or Send Pan (Rotary).
* **Synthesizers:** Cutoff (Linear) + Resonance (Rotary).
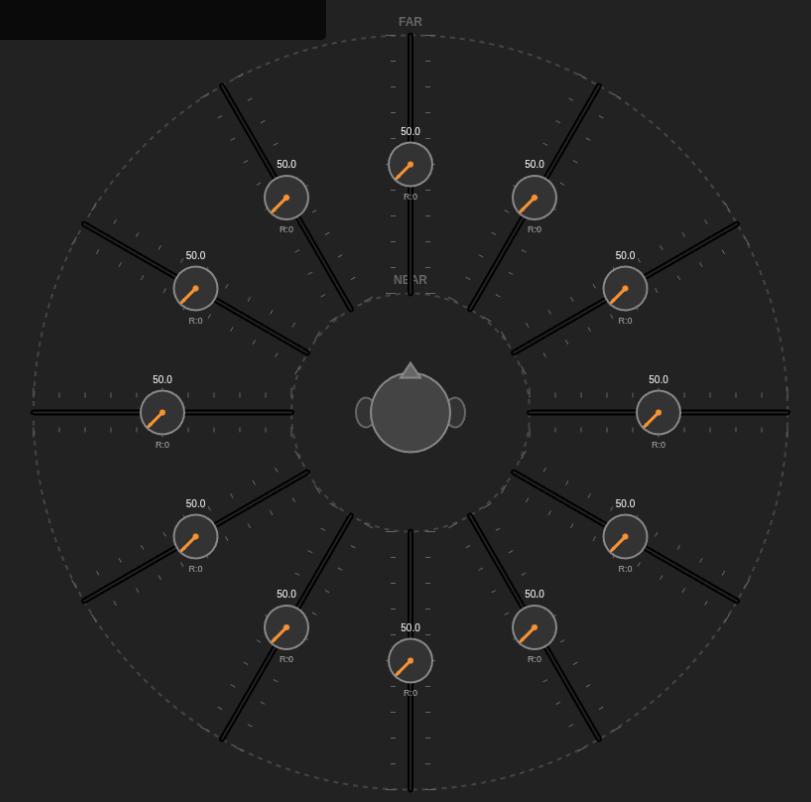
* **Spatial Audio:** Distance (Linear) + Azimuth (Rotary – mapped to circular motion).
This project is released under **The Open Concept License**.
* **Freedom:** You are free to use, modify, and distribute this work.
* **Attribution:** Explicit credit to **Anthony Kuzub** must be given in all derivative works.
* **Nomenclature:** Implementations must strictly use the terms **LTP (Linear Travelling Potentiometer)**, **GCA (Ganged Controlled Array)**, and **MDP (Multi-Dimensional Panner)** where applicable.
* **Warranty:** Provided “As Is” without warranty.


 Classic MPC Layout: The interface is built around a traditional 4×4 grid of 16 drum pads.
 Mouse-Based Velocity: It simulates physical velocity sensitivity by calculating how close the user clicks to the exact center of a pad.
 Plug-and-Play MIDI: The Web MIDI API allows users to plug in class-compliant USB controllers (like an Akai MPD) to finger-drum immediately with real velocity capture.
 Tone Mode: By holding
  Advanced Step Sequencing: The sequencer mimics classic hardware parameters, offering granular, per-step control over velocity, panning, pitch, and swing (shuffle).


 Analog-Modeled Synthesis: When no sample is loaded on a pad, the app falls back on custom synthesis engines designed to strip acoustic percussion down to its physics—such as modeling the thump of a kick drum or the high-pass filtered noise of a snare wire.